|
|
Post by BUCKY on Mar 23, 2018 23:48:35 GMT -6
I may try for a Monday start, myself.
|
|
scowha7
GAINING SPEED
  A.K.A. "ROGER"
Working with my hands gives me a break from working with my mind.
Posts: 747 
Likes: 1,591
|
Post by scowha7 on Mar 24, 2018 11:20:39 GMT -6
|
|
|
|
Post by BUCKY on Mar 24, 2018 11:28:02 GMT -6
That's a real beauty, Scott! Looking forward to seeing your version of this kit!!
|
|
|
|
Post by JCON on Mar 24, 2018 12:08:14 GMT -6
Have fun Scott with the family!!! Looking forward to your build!!!
|
|
|
|
Post by JCON on Mar 24, 2018 16:57:41 GMT -6
Started putting the flathead together and what a nightmare... destructions have arrows leading to unidentified locations with no attachment points... the exhausts have the numbers reversed and my fan belt was missing a side pulley and belt that I had to scratch... yours has it looking back at the pictures of the sprues by the steering wheel Bucky...
|
|
|
|
Post by JCON on Mar 24, 2018 17:08:30 GMT -6
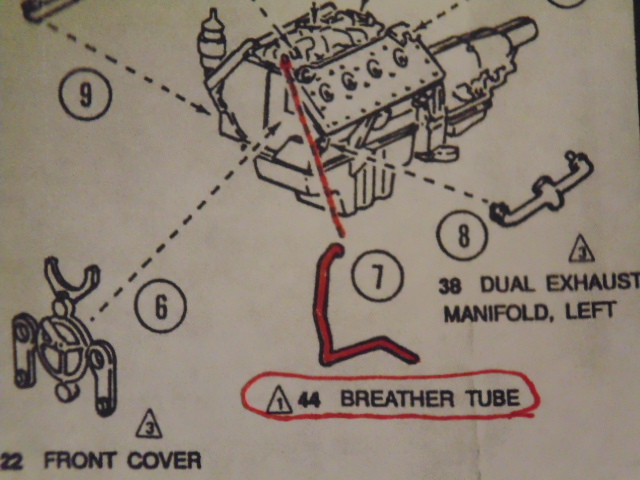
Where it tells you to attach part 44, some snake hose is where the lower radiator hoses go later in the build... I left it off altogether as I can't figure out what it is or where it goes... nowhere in the real pictures I posted...
|
|
|
|
Post by JCON on Mar 24, 2018 17:15:39 GMT -6
|
|
|
|
Post by BUCKY on Mar 24, 2018 17:40:06 GMT -6
This pic shows the radiator hose and the breather tube, which is part #44 in this kit:  Here, you can see the radiator hose going into the head. Right behind that is the sort of shiny black tube. It runs down behind the fan belt. It is labeled as a breather tube on my instruction sheet, and is part #44. |
|
|
|
Post by BUCKY on Mar 24, 2018 17:42:45 GMT -6
That tube is seen in the pic you posted. It has a little rust on it. The tube goes down the front of the block, and turns down the driver's side, along the top of the oil pan.
|
|
|
|
Post by JCON on Mar 24, 2018 18:15:06 GMT -6
|
|
|
|
Post by JCON on Mar 24, 2018 18:21:15 GMT -6
Thanks Bucky my instructions show it going across the top of the engine not below the exhaust on the drivers side... I'll see if I can snake it in later... wet paint now...
|
|
|
|
Post by JCON on Mar 24, 2018 18:43:36 GMT -6
Cut it in half and glued it in place... lower end doesn't attach to anything... runs behind the exhaust...  |
|
|
|
Post by BUCKY on Mar 24, 2018 18:48:00 GMT -6
Looks great, Joe! That tube is a vent for the crankcase. A lot of older engines had some sort of tube like that.
|
|
|
|
Post by JCON on Mar 24, 2018 18:49:43 GMT -6
You're the best buddy!!!
|
|
|
|
Post by BUCKY on Mar 24, 2018 18:57:08 GMT -6
Glad to help, bro! Scott will prolly have the same thing come up on his build.
|
|
|
|
Post by JCON on Mar 24, 2018 19:05:40 GMT -6
And now we have some decals on the engine...  |
|
|
|
Post by JCON on Mar 24, 2018 19:07:14 GMT -6
That's why I posted the mistakes and issues to try and help him out... gonna be tough with a bum hand...
|
|
|
|
Post by BUCKY on Mar 24, 2018 19:53:25 GMT -6
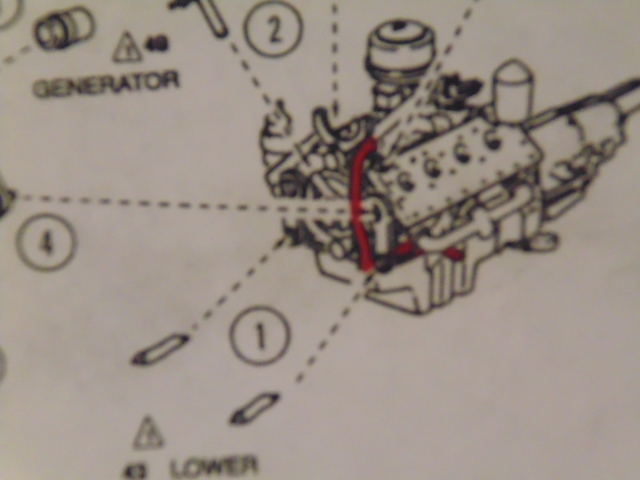
This is step #2 on my sheet:  It shows the breather tube, and a location arrow. This somewhat fuzzy image shows the tube in place:  It runs behind the fan belt. |
|
|
|
Post by JCON on Mar 24, 2018 20:10:17 GMT -6
Way better then AMT's instructions!!!
|
|
|
|
Post by JCON on Mar 24, 2018 20:12:19 GMT -6
That is right where I put it!!!
|
|